
Google and Yahoo’s new email sender requirements will come into effect February 1st 2024 so it’s crucial for eCommerce stores, especially Shopify sites, to understand and implement the required DMARC policy.
This article will walk you through how to easily implement the required DMARC record on your website domain in a matter of moments while also sharing a free tool that will check you’ve done so correctly.
What is DMARC?
DMARC stands for Domain-based Message Authentication, Reporting, and Conformance.
It’s an email authentication protocol designed to give email domain owners the ability to protect their domain from unauthorised use, commonly known as email spoofing.
The purpose of DMARC is to ensure that legitimate email is properly authenticated against established DKIM (Domain Keys Identified Mail) and SPF (Sender Policy Framework) standards, and that any fraudulent activity appearing to come from domains under the DMARC policy is blocked.
What Are The New Email Sender Requirements?
The new requirements necessitate the addition of a DMARC record on your domain.
This record is a TXT record in the domain’s DNS and looks like this:
- Type: TXT
- Host / Name / Sub Domain: _dmarc
- Value / Text Record: v=DMARC1; p=none; rua=mailto:[your email]
- TTL (Time to Live): 1 hour
Each part of this record plays a critical role in the DMARC setup.
Implementing it correctly is essential to comply with this new policy while also enhancing email deliverability and protecting your domain reputation.

How to Add a New DMARC Record
Step 1: Access Your Domain Registrar’s DNS Management Section
First, log in to the control panel of your domain registrar (GoDaddy, CrazyDomains, Namecheap, etc).
Once logged in, navigate to the DNS management area. This is usually found in the domain settings or similar section.
Step 2: Locate the Option to Add a New Record
In the DNS management section, look for an option to add a new DNS record.
This is typically labelled as ‘Add Record’, ‘Create Record’, or something similar.
Step 3: Select the Record Type
Choose ‘TXT’ as the type of record you are going to add.
This is because DMARC policies are implemented as TXT records in your domain’s DNS.
Step 4: Configure the DMARC Record Values
You will need to enter specific details for your DMARC record. Use the following format:
- Type: TXT
- Host / Name / Sub Domain: _dmarc
- This should be entered as _dmarc.yourdomain.com, where ‘yourdomain.com’ is your actual domain name.
- Value / Text Record: v=DMARC1; p=none; rua=mailto:[your email]
- Replace [your email] with the email address where you want to receive DMARC reports.
- TTL (Time to Live): 1 hour
- Or the default value provided by your registrar.
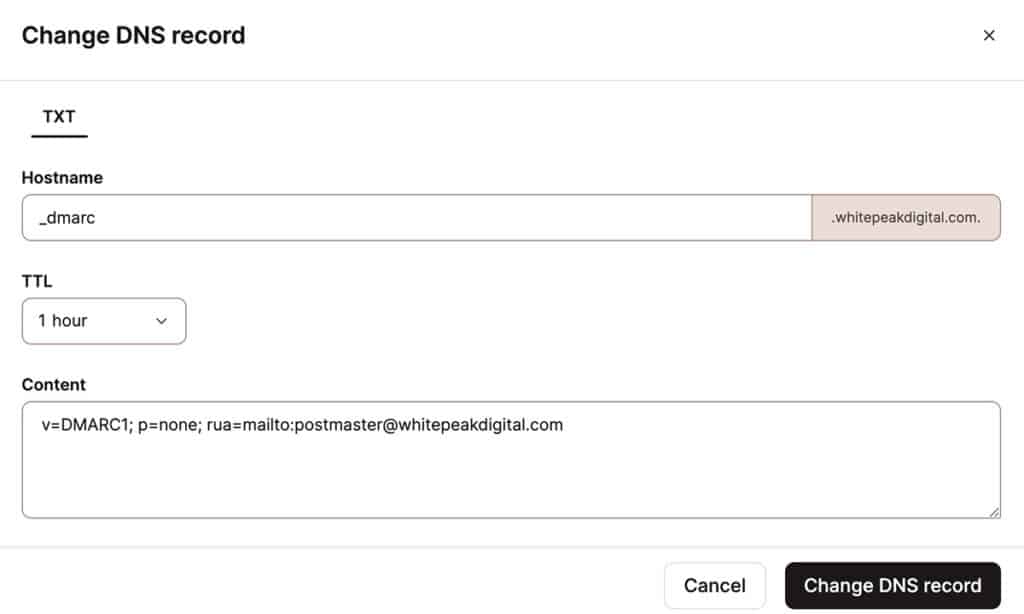
See a real example of what this looks like for whitepeakdigital.com below:
Step 5: Save the New Record
After entering the above details, save the new record. This process might be labelled as ‘Add Record’, ‘Save’, or ‘Update’.
Step 6: Verify the DMARC Record
Once you’ve added the DMARC record, it’s important to verify that it’s working correctly.
You can use tools like DMARCian’s DMARC Record Checker to confirm that your DMARC record is correctly configured.

Shopify’s Response to the New DMARC Policy
As a leading eCommerce platform, Shopify has responded proactively to Google and Yahoo’s updated DMARC policy.
They have provided detailed guidelines and support to help Shopify store owners comply with these new requirements.
Understanding Shopify’s recommendations is key for eCommerce businesses looking to maintain effective email communication with their customers. For more detailed information, refer to Shopify’s official announcement.
Rest assured, if you follow our guide above to add this new DMARC record to your domain then you’ve got everything covered!
Frequently Asked Questions
1. What is DMARC and why is it important for my eCommerce business?
DMARC is an email validation system designed to protect your email domain from unauthorised use. It’s crucial for maintaining the security and deliverability of your email communications.
2. How do I set up a DMARC record for my domain?
To set up a DMARC record, you need to add a TXT record to your domain’s DNS. The value of this record should follow the specific format required by DMARC, as explained in our detailed guide above.
3. Will implementing DMARC affect my email marketing campaigns?
Yes, implementing DMARC can positively impact your email marketing by improving deliverability and protecting your domain’s reputation.
4. Are there any tools to help me verify if my DMARC record is set up correctly?
Yes, tools like DMARCian’s DMARC Record Checker can help you verify the correct setup of your DMARC record.
Have further questions or need help adding this DMARC record to your Shopify store? Don’t hesitate to reach out to our Brisbane Shopify developers anytime!
To your success,
Jackson


